Assignment 3
Our task was to create a piece of the skin of a Ferrari 250 GTO out of aluminium sheeting. This tutorial will outline the process required to create the roof and back windscreen of the car.


Before a metal skin can be crafted, a wooden 'buck' must first be assembled to be used as a guide. This will allow for more accurate moulding of the skin as well as making it easier to visualise the end result throughout the process.
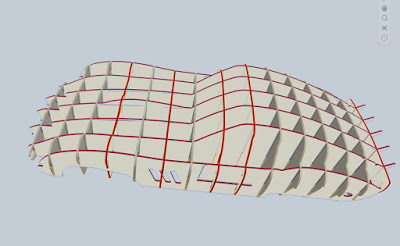
The first step in creating this buck is to acquire an .stl file of the model, in this case the car. This file type is a standard type used for 3D object, which can be exported out of programs such as Rhino, AutoCAD and Blender.

Secondly, this 3D model needs to be sliced into sections that can b slotted together to form the shape of the car. We used Fusion 360 for this. This program makes it easy to slice up the 3D model and prepare it for laser cutting.
After loading the model into Fusion 360, there are a number of parameters that need to be set. These include;
- End to End slices
- Side to Side slices
- Slot width
End to End slices is the amount of slices that you want down the length of your model. These slices are effectively cutting a section at certain points across the model, and when compiled, will give an indicative representation of the profile of the model.
Similarly, Side to side slices do the same, although along the opposite axis.
The combination of these sections cut across 2 axis will give a fairly accurate representation of the model. However, the number of slices taken will affect the clarity and detail reflected in the model so it is important to try multiple combinations and assess how many are necessary for the job at hand, as too many will make the model very difficult to assemble, and too few will not show enough detail.
After some trial and error, Our group decided on having 7 slices down the length of our car, and 15 across. Which ended up being a very successful choice, making for easy assembly, while still showing an appropriate amount of detail.
Determining the slot width was another important decision which would impact the amount of time we spent assembling the buck. After deciding to use 3mm MDF as the material for the buck, we then decided to make the slots 3.5mm to ensure that the slices fitted together with ease. As a result, the pieces all fitted very well together, however, it may have been a little too loose. Next time around, I would recommend making the slot width 3.2 or 3.25mm for a snug, yet comfortable fit.
Next, export a DWG file of all the slices laid out on a sheet, and open in a program such as autocad. In this program, ensure that all cutting lines are RED, etching lines are BLUE and non-cut lines are GREEN, however these colour vary from laser cutter to laser cutter, so check first. Also clean up any rough lines, as the export from fusion 3d may not be perfect if the model is very detailed.
Next send to a laser cutter, and cut out the slots onto 3mm MDF.


Now simply assemble the slices into the buck.

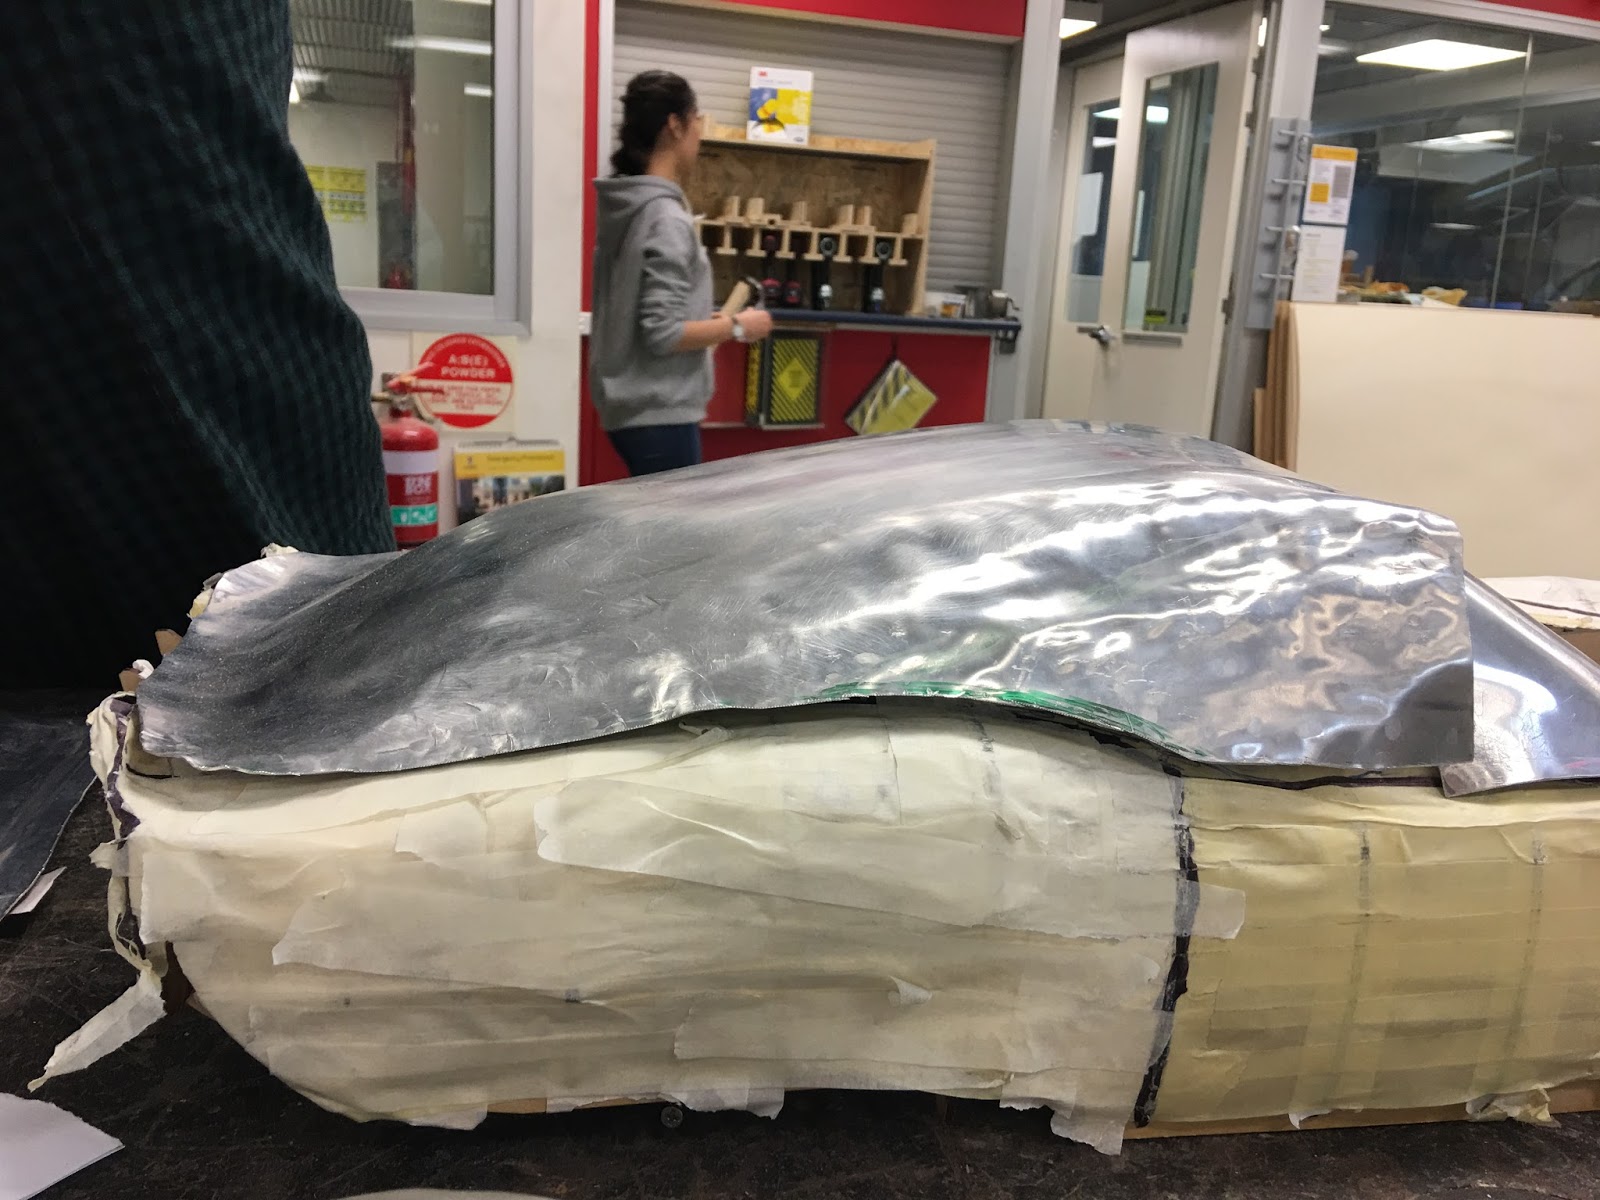
After assembling the buck, cover it in masking take, carefully following the contours of the buck. This will compensate for only have a few slices across the model, and more clearly show the elegant contours of the car.


After this, take an appropriately size piece of paper and bend/fold it over the desired area, in this case, the roof and back windscreen of the car. Now trace around the shape required onto the paper, leaving approx 2cm lee-way around the outside to account for cutting and error.

Now trace this shape onto a piece of sheet metal with a marker and cut out the shape using tin snips or another appropriate cutting tool. Remember to carefully file the edge after it has been cut to remove any sharp edges and ensure you don't get cut during the shaping process.

Now to shape the metal.
Begin by gently bending the wings of the piece over down over the side windows of the buck to get a rough shape.

Next, we need to work the metal through the English wheel, and this will be the main tool for creating the gentle arc down the back window of the car. With the sheet of metal placed in the wheel, begin moving it length ways between the wheels at a gentle pace. The angle that the metal is held at in relation to the wheels while is is being pushed through will determine the radius of the arc.
begin by just working the area that is the windscreen by holding the metal at a slight angle and firmly but slowly pulling and pushing it through the wheel. after some time, as after working across the width of the sheet, there will be a gentle curve down what will be the back windscreen of the car. Make sure to place the metal over the buck regularly to check that the cure is beginning to match up.

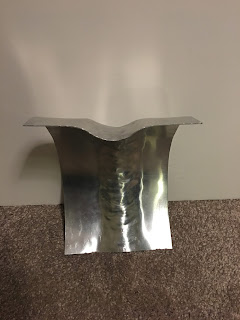
Once at a good point with the gentle curve of the back windscreen, we will move off the English wheel and work a slight spoiler into the tail of the piece. Using a flat steel hammer and a narrow curved mushroom, place the sheet upside down with approx 2cm overhanging the curve. gently tap the overhang with the hammer to create the shape of the spoiler flicking back upwards at the very rear of the var. slowly work from one side back to the other to ensure an even curve.

Once this is complete, and after checking the shape on he buck, move back to the English wheel. This time we will place the sheet upside down, and while holding it at a sharp angle, work area towards the bottom of the back windscreen where it begins to flick up for the spoiler. By working TOWARDS the spoiler only, not both ways, we can make create a smooth curve that continues all the way to where the spoiler flicks up.
After repeating this process and checking with the buck repeatedly until the metal shape is consistent with the buck.
Now we will work over a slightly larger mushroom on the side windows of the car. place the sheet the right way up with the mushroom inside the curve where the side windows turn down off the roof, and work with a flat steel hammer. working slowly along the length of the curve will ensure a consistent finish.

finally, after the curve matches the buck for the side windows, place the metal back into the English wheel and work it on a loose tightness for a couple of minutes to reform any curve that may have been lost while working on the mushroom, this will also smooth the surface.
Finally, polish the metal with a scourer and place over the buck along with the other pieces of the car and admire your work!

Reflection
4th year landscape architecture studio has been an in depth and constantly evolving process, and the process of metal shaping has not been much different. Learning about the way in which one can work with metal over time, with the shape going though multiple iterations to reach the end result, has made me reflect on this importance of this process in landscape design.
Some examples of the metal working shills being placed within the landscape architecture discipline are as follows.
Tetsuo Kondo ‘Path In The Forest’ is an example of the way shaped metal is employed to alter the way a person experiences a landscape, in this case, a forest.
The following image is an example of how formed metal is used to alter the landscape itself, by providing a framework for vegetation to grow around.
And finally, a way in which is can be used by humans within a landscape.
This hopefully illustrates the way in which metal is used for human interaction with the landscape, to influence the landscape, and also used as part of the landscape, a full spectrum.

Comments
Post a Comment